Emerging Approaches Redefining Craft-Focused Customer Experiences
Craft-focused small businesses have always relied on care, precision, and sourcing to stand out. What’s changing now is how those values are shown, not just

Can you create impressive latte art at home using a mere milk frother? Absolutely, and you might find the results to be as stunning as those achieved with a professional espresso machine. For at-home coffee lovers seeking a polished, café-quality experience, latte art isn’t just about aesthetics; it’s an expression of care and precision. With the right techniques and tools, like jug frothers and barista milk jugs, you can craft intricate designs right in your kitchen. Explore this guide to master the essentials and unlock the full potential of your coffee artistry.
Choosing the right milk and frother is key to making great latte art at home. Whole milk is the top choice since it creates a thick foam perfect for intricate designs. In contrast, low-fat and skimmed milk produce foam with larger bubbles that can hinder detail. Non-dairy alternatives often lack the creamy texture needed for exceptional art.
A milk frother, especially jug frothers, offers a practical alternative to traditional steam wands. They use induction coils for even heating, ensuring smooth foam necessary for latte art.
Jug frothers and milk pitchers are crucial for creating latte art. Jug frothers excel at consistently making the microfoam needed for beautiful designs. Pair these with a barista frothing jug to gain precise control while pouring, enhancing the overall process. Milk pitchers, available in various sizes and materials, help achieve the perfect pour. Handheld frothers are less powerful but effective for those new to the craft.
To summarize, the right tools combined with proper milk selection lay the foundation for stunning latte art with a milk frother at home.
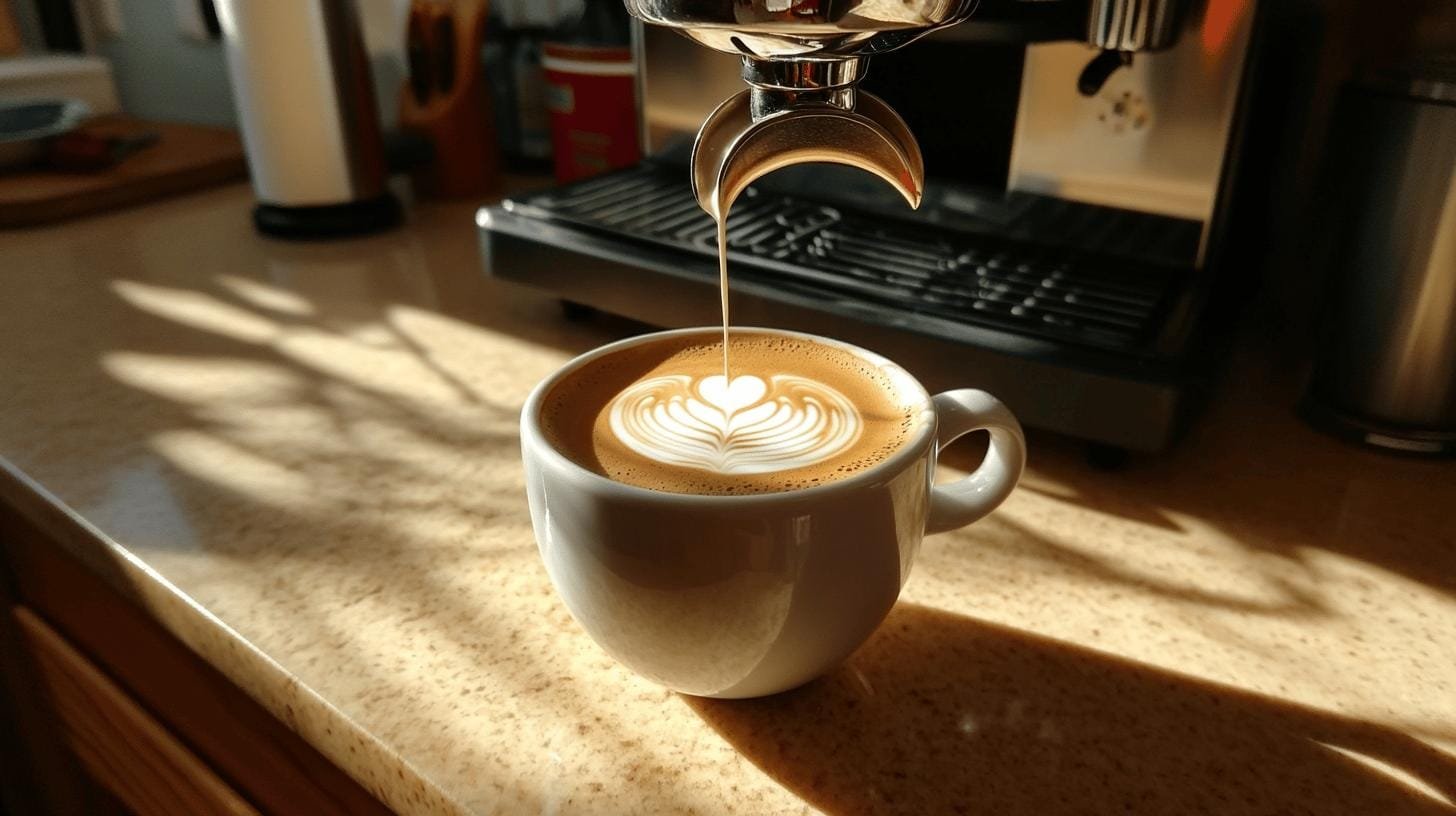
Creating latte art at home requires dedication, practice, and patience. Precision in technique and consistent practice are essential. With each attempt, you learn more about frothing milk and pouring it into the espresso. This process helps you refine your skills to produce café-quality designs.
The Heart, Rosetta, and Tulip are great starting points. Each design requires both precision and creativity. The Heart uses a gentle wiggle, while the Rosetta needs a more intricate wave motion. The Tulip combines elements of both, requiring controlled pours.
Mastery of these designs takes time, but creating a visually appealing cup is rewarding.
Tips extend beyond the technical process. Focus on maintaining the right temperature and consistency. A temperature-controlled frother aids in this, ensuring milk is ideal for texturizing. Regular practice and experimenting with angles and speeds enhance your proficiency in creating stunning designs.
Whole milk is ideal due to its high-fat content, providing creamy, dense microfoam perfect for intricate art. Low-fat and skimmed milk produce larger, less precise bubbles. Non-dairy options often lack rich consistency, making them less favorable for quality microfoam.
Microfoam consists of small, packed bubbles forming a silky surface ideal for smooth pours and crisp designs. Its stability ensures the pattern holds once poured, making it vital for appealing art. Understanding microfoam production elevates your latte art skills.
Proper milk temperature and texture are crucial. Keep milk between 140°F and 150°F for optimal texture; overheating breaks down proteins, destabilizing foam. Use a thermometer or temperature-controlled frother to achieve this. Swirling the milk jug after frothing ensures uniform texture, aiding in stunning art creation.

What issues do beginners face? Inconsistent foam texture, quick pouring, incorrect milk temperature, and over-frothing are common hurdles. Achieving perfect microfoam is essential, but newcomers may struggle with consistency. Electric frothers like handheld whisks may not always yield the desired froth.
Practice and patience are key while learning how to make latte art with a milk frother. Ensure frothy texture by using a jug frother or powerful device. Slow, steady pouring is crucial for pattern formation. Maintain milk temperature between 140°F and 150°F to preserve protein stability. Avoid over-frothing by stopping when the desired texture is reached.
To progress from basic to advanced skills, master foundational designs like the Heart, Rosetta, and Tulip before advancing. Skilled baristas start here, mastering pouring techniques and developing a steady hand.
Advanced designs like the Swan, Double Rosetta, and Dragon need precise control of milk flow and pour angles.
For instance, the Swan requires controlled wiggles and continuous pours. Advanced techniques involve manipulating milk’s velocity and direction, using swift wrist movements for multiple layers.
Consistent practice refines skills. Baristas experiment with speeds, angles, and textures to perfect their art. Through trial and error, they learn to anticipate milk behavior, enabling improvisation with new patterns and techniques. Experimentation spurs creativity and innovation, letting baristas develop unique styles. By experimenting with milk types, frothing times, and pouring methods, they discover new textures and patterns. Every experiment yields insights, transforming each cup into a canvas for artistic expression.
Mastering latte art with a milk frother opens a new avenue for coffee enthusiasts. Choosing the right milk and frother is fundamental to creating high-quality latte art. Jug frothers offer a practical solution with their even heating capabilities. Whole milk typically results in the desired thick foam, enhancing the latte art experience. While essential techniques like creating microfoam and managing milk consistency are detailed, practice remains key. Embrace patience, experiment, and enjoy the rewarding journey of latte art.
You can make latte art with a milk frother. Using a frother allows you to generate microfoam necessary for designs. However, practice and patience are key for perfect outcomes.
Whole milk is recommended for latte art because it creates a thick, full foam. It provides a smooth, creamy texture. Low-fat types yield more foam with larger bubbles, which can affect design quality.
Milk can become overly foamy when air is introduced too quickly or excessively. Aim for a steady infusion of air into the milk during frothing to achieve the silky microfoam necessary for latte art.
Optimal frothing temperatures range between 140°F and 150°F. This range ensures proper microfoam creation and maintains the sugars’ natural sweetness without burning the milk. Use a thermometer to gauge accuracy.
At home, achieve latte art without a steamer by using a milk frother to create microfoam. Pour the frothed milk over freshly brewed espresso and practice basic designs like Heart or Tulip patterns.

Craft-focused small businesses have always relied on care, precision, and sourcing to stand out. What’s changing now is how those values are shown, not just
How can brands create a more balanced and memorable customer experience by blending artisanal product quality with thoughtful everyday rituals that keep people coming back?

Independent coffee shops have always been about more than caffeine—they’re hubs of creativity, connection, and care. As café culture continues to evolve, new trends are
Introduction Independent cafes win when they feel like the neighborhood’s living room and operate with the discipline of a great kitchen. Below is a quick

Discover how top specialty coffee brands create lasting loyalty through storytelling, sourcing, and community connection. Real tips from 6 industry experts.

Discover the ultimate showdown between two beloved coffee brewing methods: the French press and Chemex. Explore how each technique caters to distinct palates, with the French press delivering bold flavors and the Chemex presenting a bright, clean taste.

Unlock the secrets to brewing the perfect cup of coffee with our comprehensive guide on using a coffee scale. Discover how precise measurements enhance flavor and consistency while eliminating bitterness.

Discover how water temperature plays a vital role in brewing the perfect cup of coffee. This article delves into the ideal temperature range of 195°F to 205°F for optimal flavor extraction, enhancing the enjoyment of high-quality beans.

Discover the world of curated specialty coffee bundles, perfect for enthusiasts seeking quality and craftsmanship. This article explores the benefits of ethically sourced, small-batch beans from brands like Equipoise Coffee, offering diverse flavor profiles that elevate your brewing experience.